Programming iOS 14 - Layer
《Programming iOS 14: Dive Deep into Views, View Controllers, and Frameworks》第3章
Layers
- A UIView does not actually draw itself onto the screen; it draws itself into its layer, and it is the layer that is portrayed on the screen.
- a view is not redrawn frequently;
- instead, its drawing is cached, and the cached version of the drawing (
the bitmap backing store) is used where possible. - The cached version is, in fact, the
layer. - the view’s graphics context is
actuallythe layer’s graphics context. - a layer is the
recipientandpresenterof a view’s drawing - Layers are
made to be animated - View持有layer,是layer的代理(
CALayerDeletgate)- 但layer不能找到View
- View的大部分属性都只是其
underlying layer的便捷方法 - layer能操控和改变view的表现,而无需ask the view to redraw itself
自定义underlaying layer的方法
class CompassView : UIView {
    override class var layerClass : AnyClass {
        return CompassLayer.self
    }
}
Layers and Sublayers
layer的继承树跟view的继承树几乎一致
layer的
masksToBounds属性决定了能否显示sublayer超出了其bounds的部分,这也是view的clipsToBounds的平行属性sublayers是可写的,而subviews不是- 所以设为nil可以移除所有子层,但subview却需要一个个
removeFromSuperview
- 所以设为nil可以移除所有子层,但subview却需要一个个
zPostion决定了层级(order),默认值都是0.0a layer does not have a center靠
position和anchorPoint定位- position: 在superLayer中的位置
- anchorPoint: 用小数表示的bound(宽/高)位置,左上(0, 0), 右下(1, 1), default:(0.5, 0.5)
- 所以(0.5, 0.5)的anchorPoint,对应的
poosition就等同于center了,理解一下- 其实就是说你的“锚点”在superLayer的什么位置的意思
- When you get the frame, it is calculated from the
bounds sizealong with thepositionandanchorPoint.- When you set the frame, you set the
boundssize andposition
- When you set the frame, you set the
// demo, 把一个80x40的layer,左上角放到(130, 120的位置)
let layer = CALayer()
layer.bounds = CGRect.init(x: 0, y: 0, width: 80, height: 40)
layer.backgroundColor = UIColor.yellow.cgColor
layer.position = CGPoint.init(x: 130, y: 120)
layer.anchorPoint = CGPoint.init(x: 0, y: 0)
如果一个layer的position是(0, 0),锚点是(0,0),刚好显示在左上角 而(0.5,0.5)则只能显示右下角的1/4了 即(0.5, 0.5)到了原来(0,0)的位置。所以说其实就是把自身bounds度量下的哪个位置移到(0,0)
这么说来,对锚点的最正确理解其实是,
- 我把自身坐标系里的哪个点定义为原点,
- 并且,这个点移到原本“左上角”的位置(想象0.5,0.5)
- 并且,所有的旋转之类的动画本来是对“左上角”的位置进行的,不管现在这个位置是layer上的哪个部分
- 或者说,旋转永远是发生在
position上的,你把哪个点放到position上它不管
- 或者说,旋转永远是发生在
理解frame的小练习
// 如果我设了layer的frame:
circle.frame = CGRect.init(x: 50, y: 50, width: 200, height: 200)

// 实际上是通过size, position, anchorPoint来实现的:
circle.bounds = CGRect(x: 0, y: 0, width: 200, height: 200)

// 以左上角为anchorPoint
circle.position = CGPoint(x:50, y:50)
circle.anchorPoint = CGPoint(x:0, y:0)
// 或者,以中心为anchorPoint
circle.position = CGPoint(x:150, y:150)
circle.anchorPoint = CGPoint(x:0.5, y:0.5)
// 或者其它任意anchorPoint,前提是自己换算
// 而且,虽然位置是一样的,但会影响transform
CAScrollLayer
- 你想通过移动layer的bounds来重定位sublayers,可以使用
CAScrollLayer - 但是它并不能通过拖拽来移动里面的内容(记得它没有响应链)
- 而是理解为一个
masksToBounds的窗口,你只能看到它bounds里面的内容 - 能通过本身的
scroll(to:)方法,和sublayers的scroll(_:)和scrollRectToVisible(_:)方法来改变scroll layer的bounds,达到显示sublayer指定区域的目的
Layer and Delegate
- 对一个不是UIView的undrelying layer的layer,让(任意)一个对象成为其delegate,可以由它来操控它的layout和drawing
- 但千万不要让UIView成为不是其underlying的layer的代理,反之亦然
Layout of Lyaers
- When a layer needs layout, either because its bounds have changed or because you called
setNeedsLayout
Drawing in a Layer
- set
contentsis the simplest way to draw in a layer ->CGImage- 但
contents能接受任何类型,所以不正确的content只会fail silently
- 但
- layer也有一个
draw(_:)方法,它被(自动)调用的时候通常表示要redisplay itself`,什么时候需要redisplay itself?- 如果
needsDisplayOnBoundsChange是false,那么就只有在sefNeedDisplay方法(及其inRect衍生方法)里会触发- 如果是非常重要的重绘,那么需要再显式调用一次
displayIfNeeded
- 如果是非常重要的重绘,那么需要再显式调用一次
- 是true的话就如其名,在bounds变化的时候也会重绘
- 如果
- 有四个方法能在redisplay的时候调用:
- subclass的
display重载,它没有graphics context,所以只能提供图片 - delegate的
display(in:)方法,同样,只能提供图片 - subclass的
draw(in:)方法,有context,所以能直接在里面绘图,但不会make current context - delegate的
draw(_:in)方法,限制也同上
- subclass的
- underlaying layer不应调用上面的方法,而交由view的
draw(_:)方法- 一定要调也可以,但要显式实现view的
draw(_:)方法,方法体为空就行了
- 一定要调也可以,但要显式实现view的
Drawing-Related Layer Properties
- contentsScale: 像素对高分屏的映射,Cocoa管理的layer会自动设置,自定义的类需要注意这个scale
- opacity: 就是view的
alpha- Changing the isOpaque property has no effect until the layer redisplays itself.
Content Resizing and Positioning
- A layer’s content is stored (cached) as a bitmap which is then treated like an image:
- 如果content来自一张图片,那么缓存的就是图片(CGImage),大小就是图片的point size
- 如果来自绘图,那么存的是graphics context
ContentGravity,类似UIView’s contentMode property,即缩放拉伸- 因为坐标系不同的历史原因,top, bottom是相反的
- 如果是自己绘制,则这个属性无意义,但结合下面的rect属性又有用了,因为截取了rect大小的绘制
contentsRect,结合上一个属性,做购物网站那种截取一小块,绘制到一个大图上去。这里是绘制到view上- 默认是全图(0,0,1,1)
contentsCenter?? 好像是对上述rect属性划成9宫格,不同位置的格子缩放规则不一样,比如四个角落的格子,不会缩放- 所以给了一个center region(rect),把它的四条边延长,就有9个格子了
Layers that Draw Themselves
系统内置了一些能自我绘制的layer:
- CATextLayer,轻量版的UILabel。通过
string属性存取,与contenta会冲突,不要同时设。 - CAShapeLayer, 有path属性,可以与
contents共存,path绘制于content之上,并且不能设融合模式 - CAGradientLayer,通过背景色做的渐变,去了解下clip和mask
Transforms
- view的transform是根据其center来应用的,layer的是根据
anchorPoint- 所以
anchorPoint就两个作用,把它移动到position的位置,和以它为中心进行旋转
- 所以
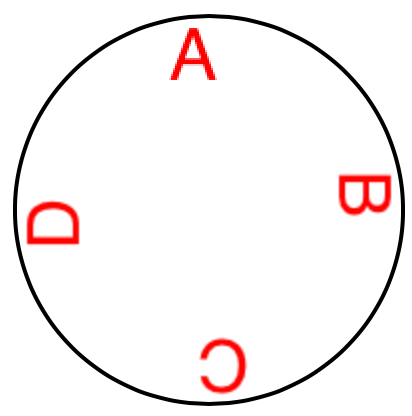
- 画刻度,核心是把文字先往上挪到圆圈的位置,所以anchorPoint只动y不动x (center, midY/textHeight)
let str = "ABCD"
for (i, s) in str.enumerated() {
    let t = CATextLayer()
    t.string = String(s)
    t.bounds = CGRect.init(x: 0, y: 0, width: 40, height: 40)
    t.position = circle.center // 这才是核心,一切定位和旋转的基准
    let vert = circle.bounds.midY/t.bounds.height
    t.anchorPoint = CGPoint.init(x: 0.5, y: vert) // 半圆是文字调蓄的多少倍,就上移多少,但隐形的脚(即高跷的支点)仍在position处
    t.foregroundColor = UIColor.red.cgColor

    t.setAffineTransform(CGAffineTransform(rotationAngle: .pi/2.0 * CGFloat(i)))
    circle.addSublayer(t)
}
结果如图:
- 画箭头,演示了复杂的绘制怎么把它代理出去,并且什么时机让它产生绘制:
// the arrow
let arrow = CALayer()
arrow.contentsScale = UIScreen.main.scale
arrow.bounds = CGRect(0, 0, 40, 100)
arrow.position = self.bounds.center
arrow.anchorPoint = CGPoint(0.5, 0.8) // 箭尾凹进去的位置(所以不可能是1.0)
arrow.delegate = self // we will draw the arrow in the delegate method
arrow.setAffineTransform(CGAffineTransform(rotationAngle:.pi/5.0))
self.addSublayer(arrow)
arrow.setNeedsDisplay() // draw, please
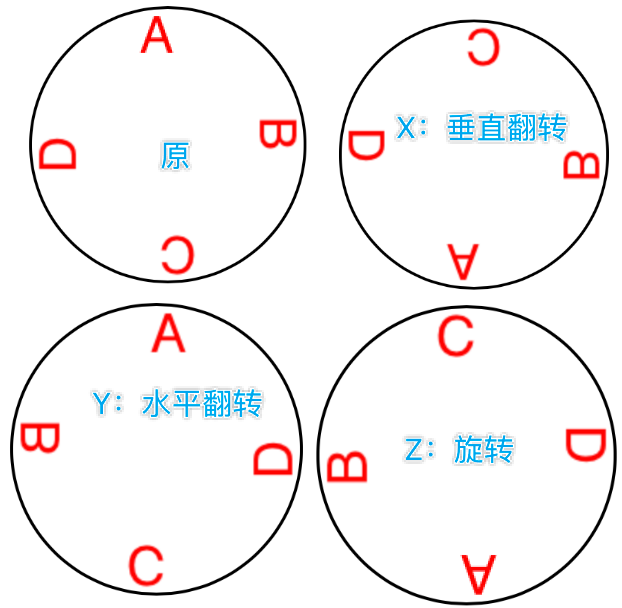
** 3D Transforms
- A layer’s
affineTransformis merely a façade for accessing itstransform. - A layer’s
transformis a three-dimensional transform, aCATransform3D
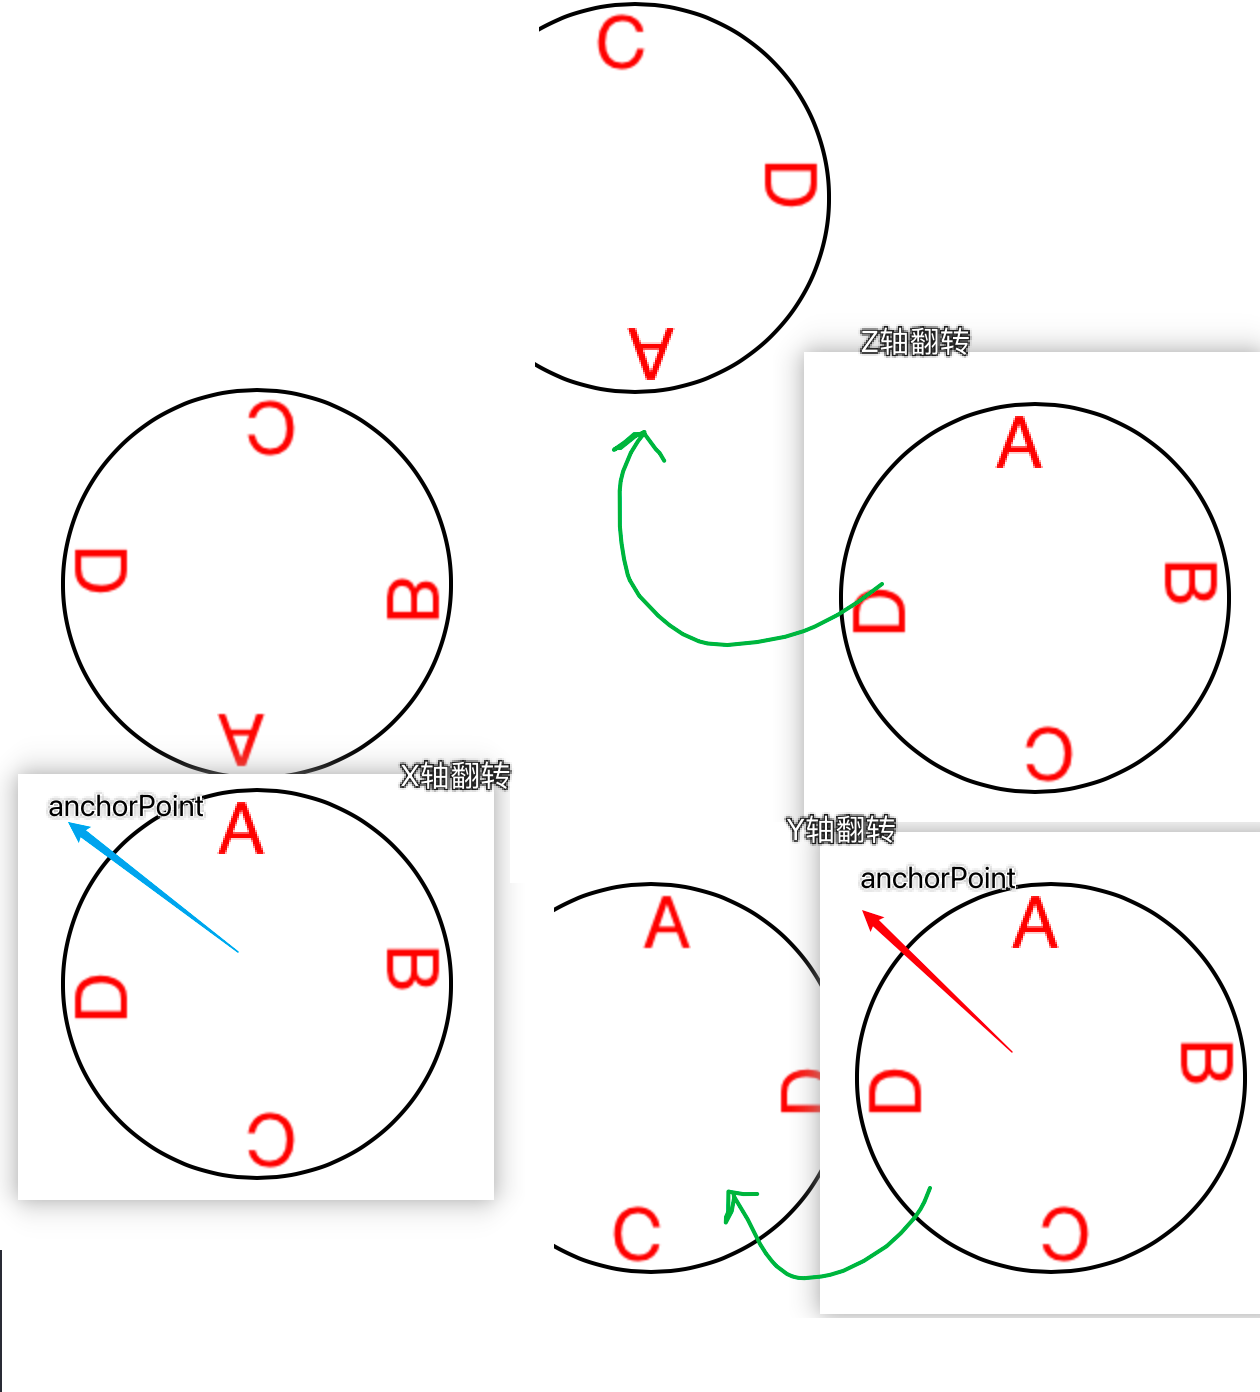
绕Y轴镜像的示例:
someLayer.transform = CATransform3DMakeRotation(.pi, 0, 1, 0)
一般而言,在Z轴没有分量的平面图,那就只剩旋转的效果了(没有翻转)
这是把anchorPoint设在了圆心,如果设在(0,0):
- layer不是为了3D建模而诞生的(考虑
Metal),它是2D对象,为speed和simplicity而设计
depth
现实世界z-component的加入会近大远小,layer绘制没有表现出这种距离,而是压平到一个面:orthographic projection,但是使用了一些技巧来制造这种视觉效果。
[waiting for demo]
Futher Layer Features
shadows
- The shadow is normally based on the shape of the layer’s
nontransparentregion- 所以完全透明的视图是没有阴影的
- clip和shadow是不可能同时存在的,技巧是用另一个view叠到底层,让它实现阴影。
Borders and Rounded Corners
- 想要圆角,就必须用
masksToBounds来实现clip,同时还要阴影的话,又得借助上图的技巧了。 - 从iOS 11起,可以单独设置圆角了:
maskedCorners,它由minx, miny, maxx, maxy这种风格的描述进行组合,而不是我们期望的top-left之类的。
Masks
- A CALayer can have a mask. This is itself a layer, whose content must be provided somehow.
- 只有透明部分有作用
- 透明的位置,对应的layer位置也是透明的
- 反过来想不透明的部分,还是被应用mask的layer能显示的部分
- 这就是photoshop里图层蒙板”涂黑就是显示“的意思
- there is no built-in mechanism for automatically resizing the mask as the layer is resized.
- 把一个view当作另一个view的mask属性,底层就是相应的layer
下例用mask来制作自己的圆角矩形,注意里面context和path的关系。在context里面,新建的path都是能直接绘制的,而不需要这个path设为谁的属性(drawRect:方法里也是一样,只要新建path,再自行去stoke, fill都行,
而context上也可以直接绘制
func mask(size sz:CGSize, roundingCorners rad:CGFloat) -> CALayer {
    let rect = CGRect(origin:.zero, size:sz)
    let r = UIGraphicsImageRenderer(bounds:rect)
    let im = r.image { ctx in
        // context绘制
        let con = ctx.cgContext
        con.setFillColor(UIColor(white:0, alpha:0).cgColor)
        con.fill(rect)
        con.setFillColor(UIColor(white:0, alpha:1).cgColor)
        // path绘制
        let p = UIBezierPath(roundedRect:rect, cornerRadius:rad)
        p.fill()
    }
    let mask = CALayer()
    mask.frame = rect
    mask.contents = im.cgImage
    return mask
}
Layer Efficiency
由于移动设备算力的影响,大量叠加的半透明图层的渲染是一件很消耗且低效的事,特别是动画的时候。
debug:
- Core Animation template in Instruments
- New in Xcode 12, animation “hitches” can be measured with
XCTMetricsduring performance testing. - the Simulator’s
Debugmenu lets you summoncolored overlaysthat provide clues as to possible sources of inefficient drawing- 真机:Debug → View Debugging → Rendering
- New in Xcode 12, the view debugger (“View Debugger” on page 75) can display layers — choose Editor → Show Layers — and can offer suggestions for improving layer rendering efficiency.
tips:
- opaque drawing is most efficient.
- Nonopaque drawing is what the Simulator marks when you check Debug → Color Blended Layers.
- “freezing” the entirety of the layer’s drawing as a bitmap.
- 直接绘制效率确实比缓存效率高
- 但是过深过复杂的继承树,没必要每次都实时计算渲染
- by
shouldRasterize = trueandrasterizationScale = UIScreen.main.scale
drawsAsynchronously = true
Layers and Key-Value Coding
layer.mask = mask
// or:
layer.setValue(mask, forKey: "mask")

self.rotationLayer.transform = CATransform3DMakeRotation(.pi/4.0, 0, 1, 0)
// or:
self.rotationLayer.setValue(.pi/4.0, forKeyPath:"transform.rotation.y")
不代表
CATransform3D有rotation属性- 它没有任何属性
- 它甚至不是一个对象
self.rotationLayer.transform.rotation.y = //... no, sorry
some transform key:
• "rotation.x","rotation.y","rotation.z" • "rotation" (same as "rotation.z") • "scale.x","scale.y","scale.z" • "translation.x","translation.y","translation.z" • "translation" (two-dimensional, a CGSize)
- The
Quartz Coreframework also injects key–value coding compliance intoCGPoint,CGSize, andCGRect, allowing you to use keys and key paths matching theirstruct component names.
see “Core Animation Extensions to Key-Value Coding” in Apple’s Core Animation Programming Guide
- you can treat a
CALayeras a kind ofdictionary, and get and set the value for any key.- view有tag,layer就有任意key