Advanced Graphics With Core Animation 笔记
Core Animation
Core Graphics
- Core Animation is supposed to be the graphics system of the framework, but there is also Core Graphics.
- Core Graphics is entirely done on the CPU, and cannot be performed on the GPU.
- Because it is an entirely CPU-bound operation
- you can combine it with Core Animation.
- You can use
Core Graphicsto create the actual bitmaps, and useCore Animationto display them to create some cool effects.
- You can use
Core Animation
- It is comprised of a series of layout objects. >>> typically
CALayer
import QuartzCore

let newLayer = CALayer()
newLayer.frame = CGRectMake(0, 0, 100, 100)
newLayer.backgroundColor = UIColor.redColor().CGColor
newLayer.cornerRadius = 10
UIKit
- Everything you see when you look at a
UIViewis not being done on theUIViewlevel, but by a backing layer attached to that view. - The layer is providing the visual content,
UIViewis providing other things:- order layout functionality, touch recognition, guest recognizers.
public class UIView {
   public var layer: CALayer { get }
}
为什么不让UIView直接继承CALayer
- CALayer确实有自己的子类
- 它们可以插入UIView的subLayer中,并指定其为暴露的那个layer,这种设计决定了它需要有一个“容器"
- 比如用一个渐变的layer子类来替换原来的layer:
public class MyGradientClass : UIView {
    override class func layerClass() -> AnyClass {
       return CAGradientLayer.self
    }
}
- Mapping contents to CALayer:
someLayer.contents = someImage.CGImage- the
.contentsproperty isanimatable
- the
Scale (with contentGravity property):
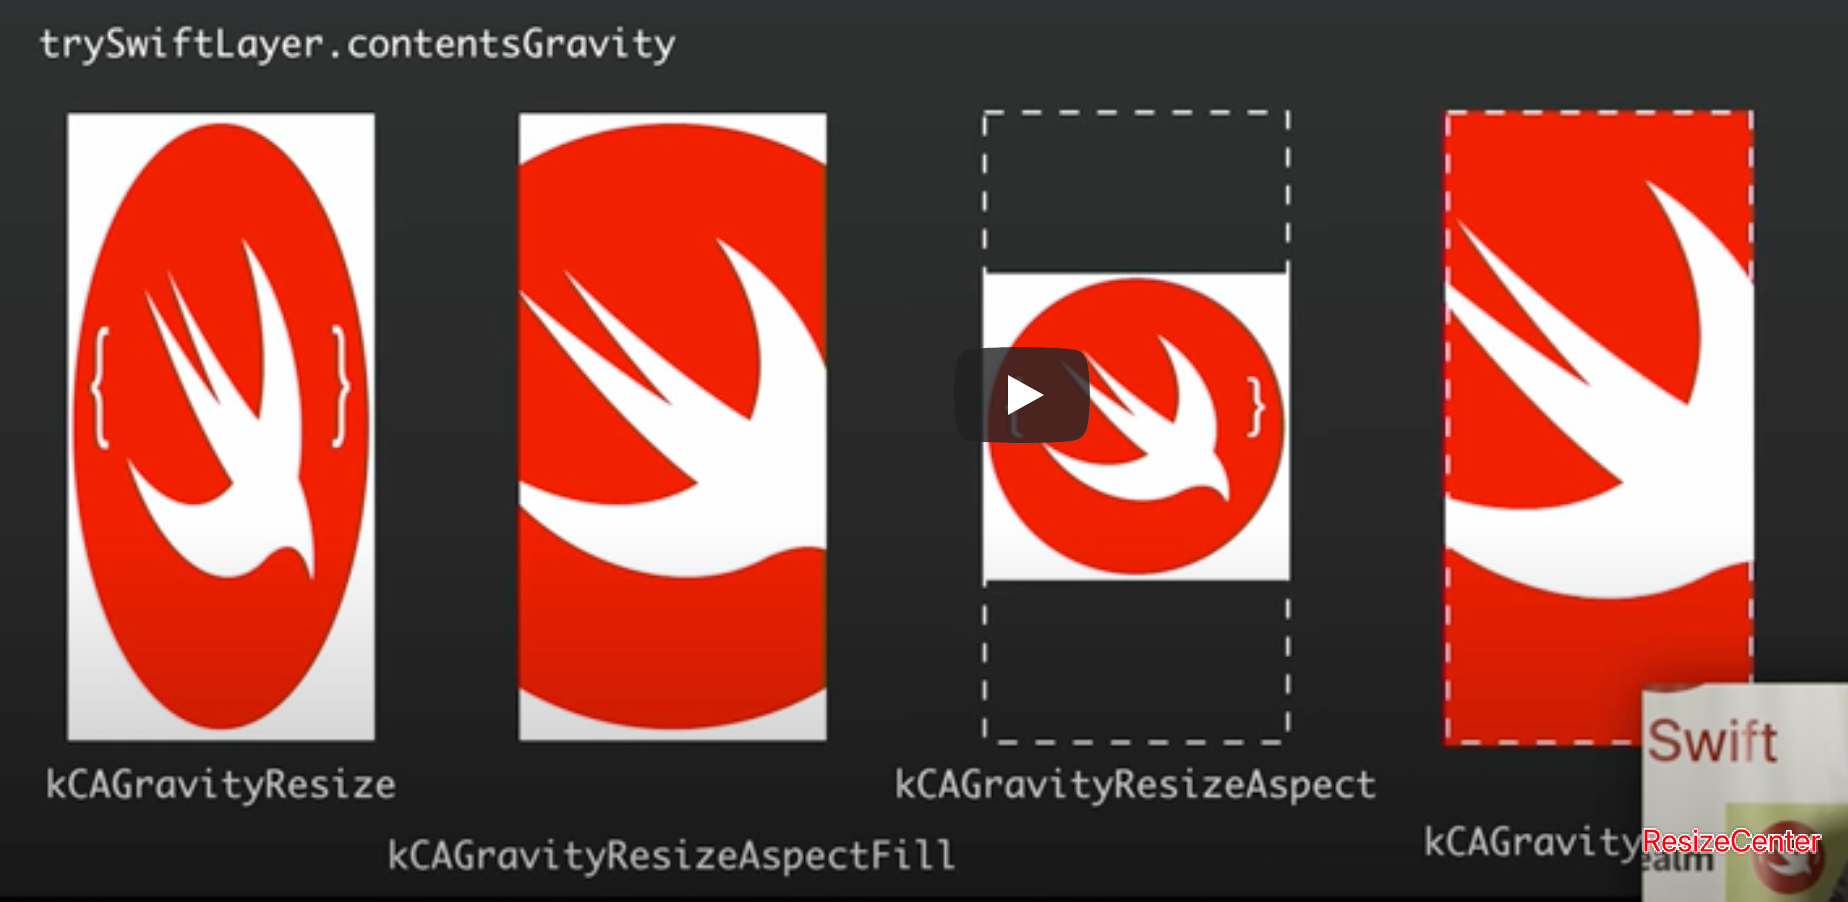
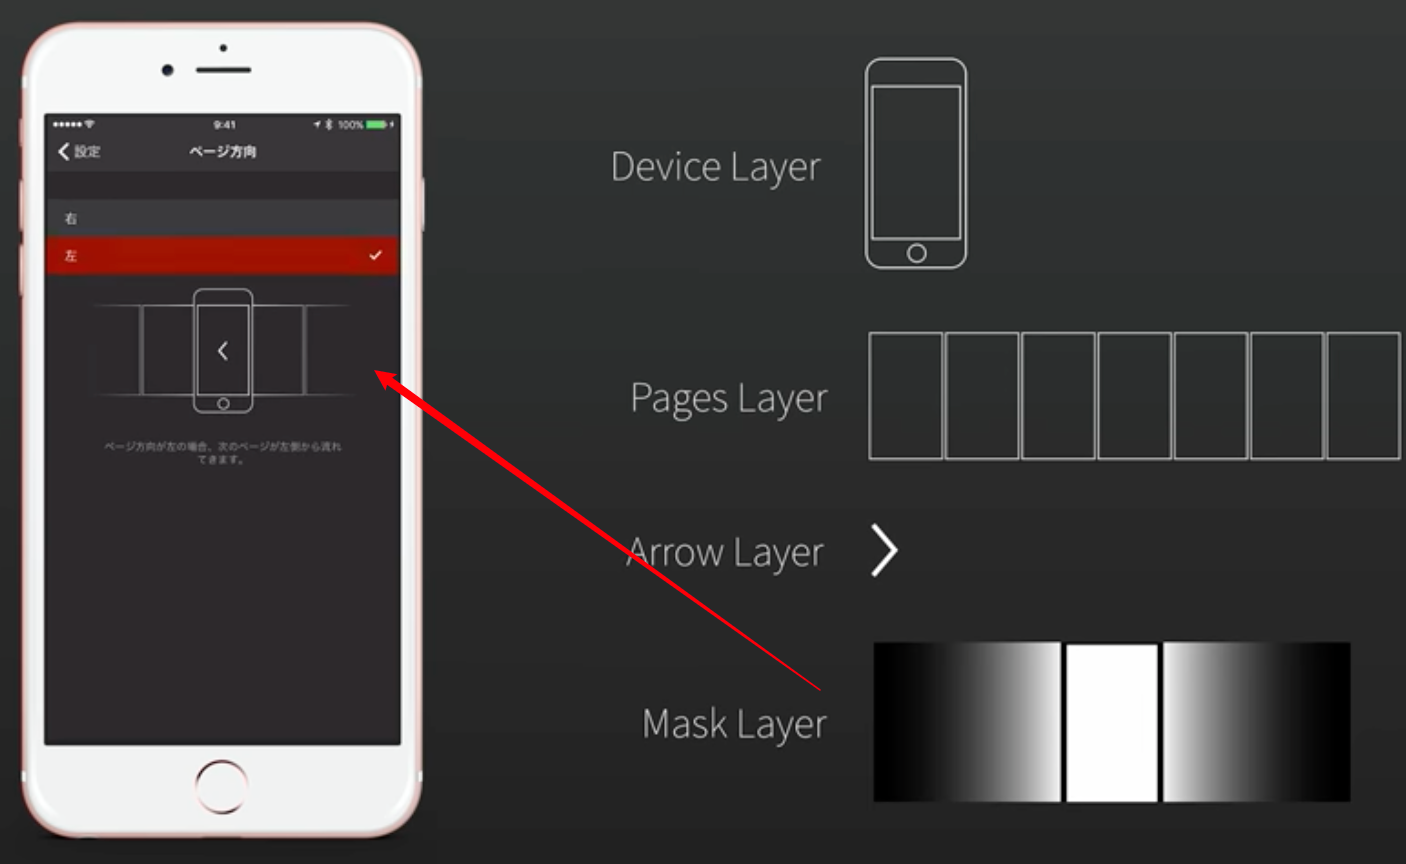
- 场景一:屏幕向下拉,背景图越变越大(根据设置的填充和变形方式,以及容器的frame)
- 场景二:类似macOS的docker,鼠标(滑块/slider)在图标上滚过的时候放大,处理为一个滑块,和左右两个layer,分别设置了只显示左边或右边的
gravity
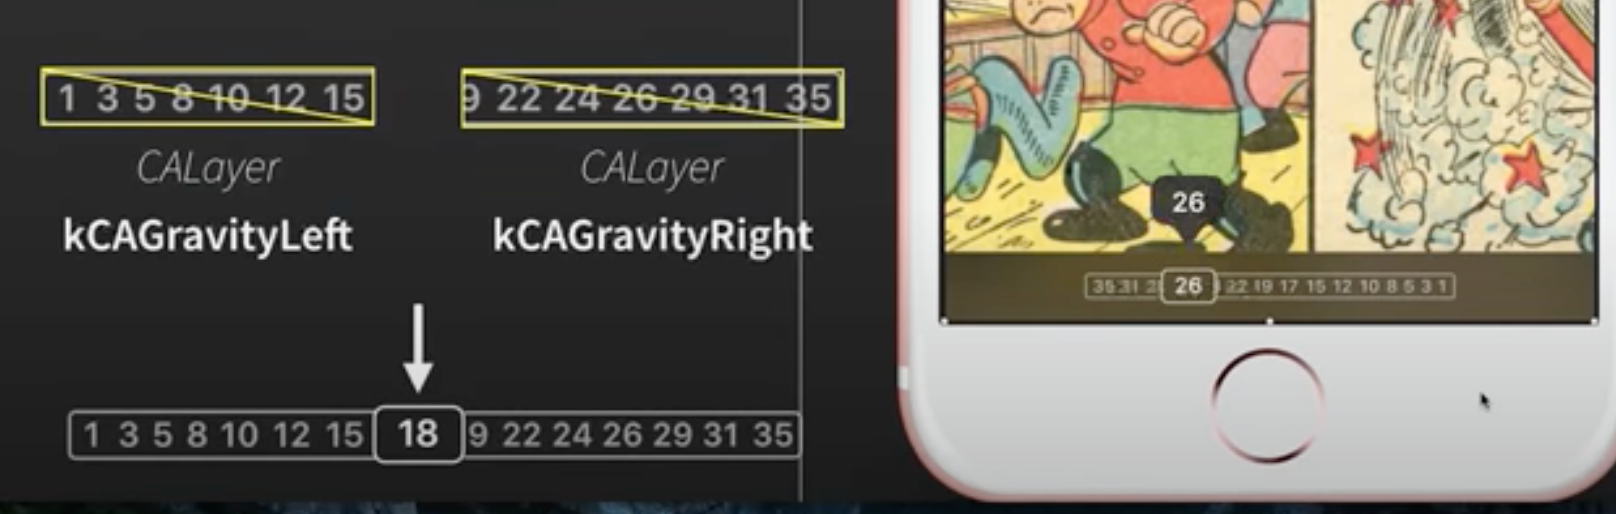
我本以为是两张页码背景图是重合的,根据滑块位置来“切”掉对应的左侧图和右侧图,但是显然这个方案是左右两个背景图是并列的,它同时改的两个图的frame(其实就是width加起来永远是100%),然后设置resize的方案是让左边的从左显示起,右边的从中显示起就行了
但仔细一想,仍然可以理解为两张图是重合的,分别往左右两方去resize使得两张图的frame并不相交而已
场景二的其它方案:
- Because this method leverages the GPU, it is incredibly performant.
- There are other ways you could have gone about doing this.
- For example, using a masking layer, or doing it in Core Graphics.
- But, because both of them would have leveraged the CPU, it would have been slower.
Bitmap Sampling in CALayer
- Core Animation also exposes settings that lets you configure which resizing resampling algorithms the GPU uses.
- Whenever you change the size of a layer and the size no longer matches the original size of the bitmap mapped to it, resampling needs to be done to make sure it does not look jagged or distorted.
- By default, the sampling mode that Core Animation uses is called bilinear filtering (
kCAFilterLinear), a simple linear interpolation between two pixels. (线性插值最快) - Sometimes, even bilinear filtering is too
slow. If you are rapidly resizing a frame during animation, you might get stuttering.- 这时可以使用 nearest (
kCAFilterNearest). Nearest mode completely disables pixel resampling.
- 这时可以使用 nearest (
- trilinear filtering (
kCAFilterTrilinear) 则能提供最好的resampling质量,the GPU will generate differently sized versions of the same bitmap, and blend them together to create resizing of the texture in question.- 最慢,而且把CPU也拉进来了
- By default, the sampling mode that Core Animation uses is called bilinear filtering (
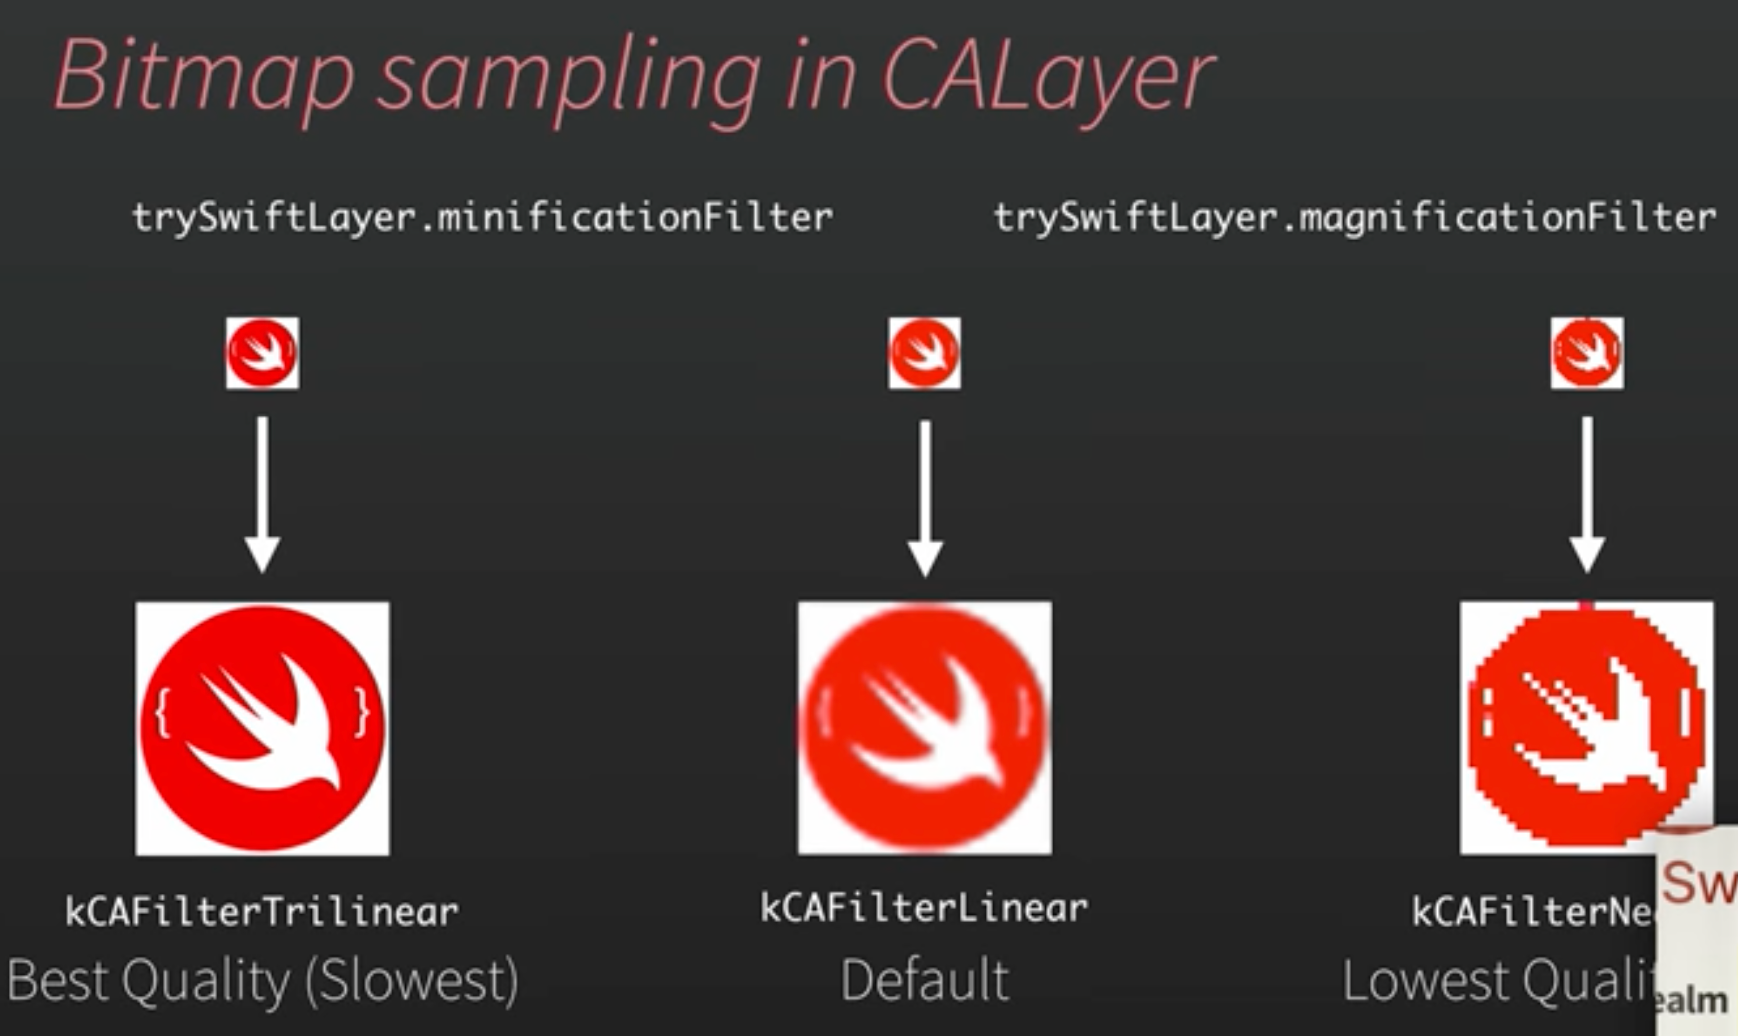
最近邻插值图像质量最差,但也最省资源最快速,用在动画切换场景(视频里演示了app退到桌面时,app的icon由当前app界面的截图逐渐变回logo的过程,这个截图显然就不需要高质量的图片)
- 同时也暗示了在图片展示区域本来就很小时,也没必要应用高质量scale
- 或者动画相当快时,也尽量用最近邻插值
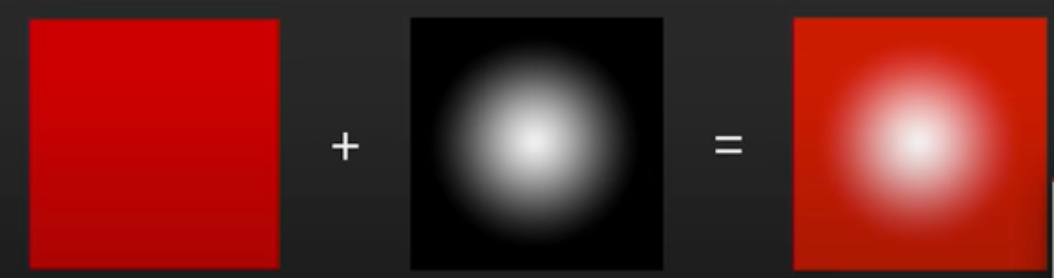
Masking CALayer Objects
让一个layer(A)成为另一个layer(B)的
mask属性A会被B(涂黑的区域)
clip,同时仍然具有功能性,交互性,和动画性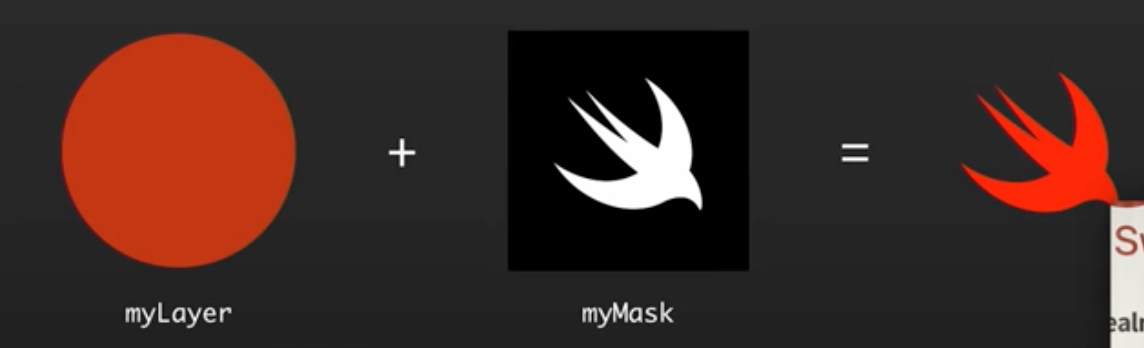
Adding Shadows to CALayer
The following code will indeed render a shadow. However, because the system has to do a per pixel comparison to work out the size of the shadow, it will be incredibly slow in terms of rendering and animation.
let myLayer = view.layer
 myLayer.shadowColor = UIColor.blackColor().CGColor
 myLayer.shadowOpacity = 0.75
 myLayer.shadowOffset = CGSizeMake(5, 10)
 myLayer.shadowRadius = 10

// IMPORTANT FOR PERFORMANCE
let myShadowPath = UIBezierPath(roundedRect:
                     view.bounds, cornerRadius: 10)

myLayer.shadowPath = myShadowPath.CGPath
As a result, whenever you are working with shadows in Core Animation, you should always make sure to set the .shadowPath property. This property will tell Core Animation in advance what the shape of the shadow will be, reducing render time.
Transforming a CALayer
- Core Animation also provides a transform property on
CALayer. - Unlike the transform property on UIView, which is purely 2D, the one on
CALayerprovides 3D transformations.
let myLayer = CALayer()
myLayer.contents = self.makeTrySwiftLogoImage().CGImage

var transform = CATransform3DIdentity
transform.m34 = 1.0 / -500
transform = CATransform3DRotate(transform, 45.0f * M_PI / 180.0, 0, 1, 0)
myLayer.transform = transform
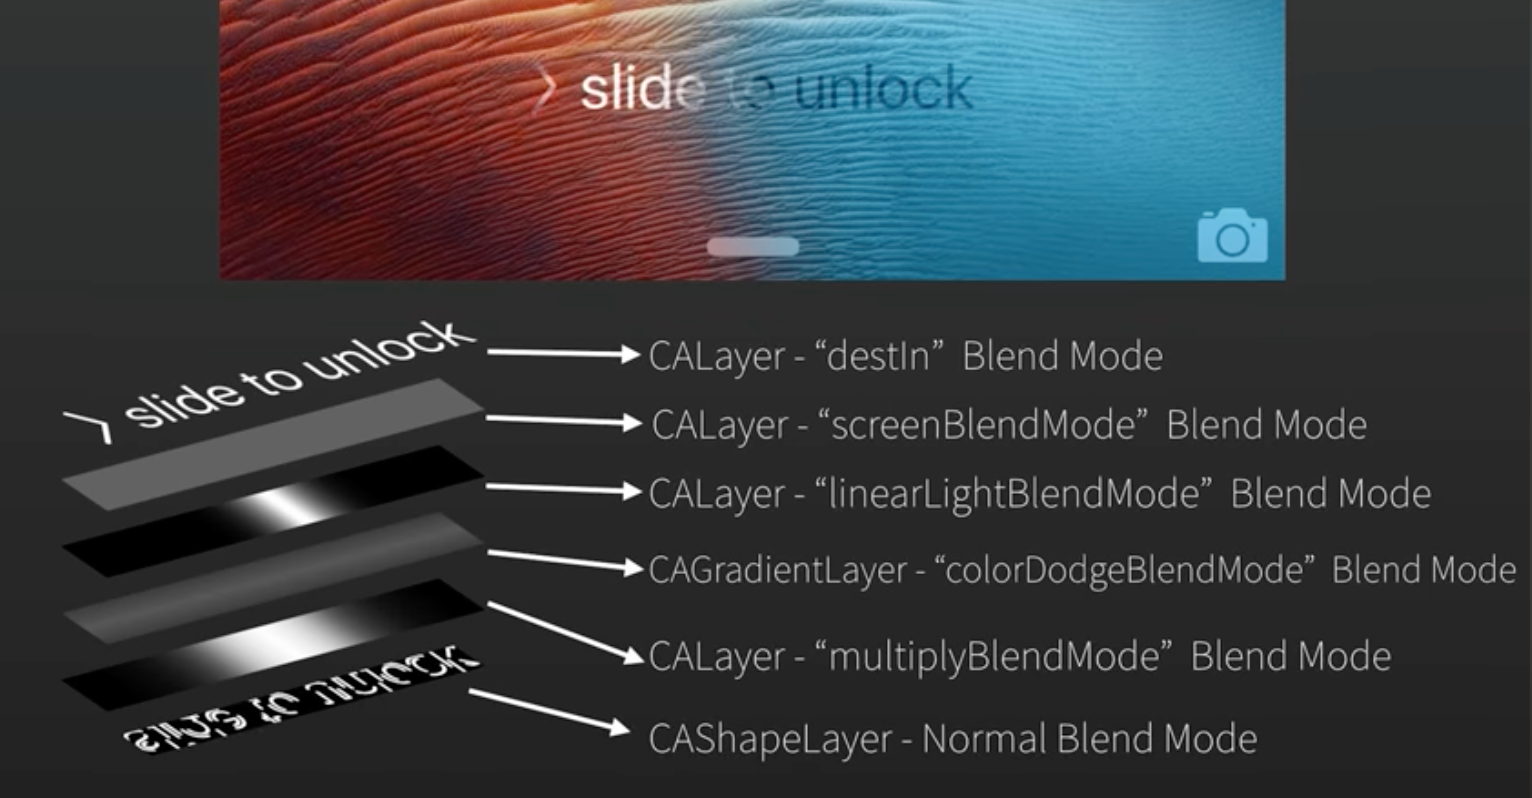
Blend Modes with CALayer
看看就好
let myBlendLayer = CALayer()
myBlendLayer.setValue(false, forKey: “allowsGroupBlending”) // PRIVATE
myBlendLayer.compositingFilter = “screenBlendMode"
myBlendLayer.allowsGroupOpacity = false
myLayer.addSublayer(myBlendLayer)
苹果的"slide to unlick"重度应用了blend mode(注意那道左右跑动的流光)
Animating with Core Animation
UIView实现方式:
let trySwiftLayer = //...

let myAnimation = CABasicAnimation(keyPath: “position.x”)
myAnimation.duration = 2
myAnimation.fromValue = trySwiftLayer.position.x
myAnimation.toValue = trySwiftLayer.position.x + 500
myAnimation.timingFunction = kCAMediaTimingFunctionEaseInEaseOut
myAnimation.repeatCount = .infinity

trySwiftLayer.addAnimation(myAnimation, forKey: “myAnimationKeyName”)
- You can access these animations from the
.animationsKeysproperty of the layer.
// timing function
let timingFunction = CAMediaTimingFunction(controlPoints: .08, .04, .08, .99)

let myAnimation = CABasicAnimation()
myAnimation.timingFunction = timingFunction
如果你要实现一个
cross fade的效果,可能想的是两个view,同时切换alpha由0到1(和相反)- 当同时达到0.5时,人眼能捕捉到这一刻,两个图片都非常明显
// animating a calayer's contents
let imageView = UIImageView()
let onImage = UIImage()
let offImage = UIImage()

let myCrossfadeAnimation = CABasicAnimation(keyPath: “contents”)
myCrossfadeAnimation.fromValue = offImage.CGImage
myCrossfadeAnimation.toValue = onImage.CGImage
myCrossfadeAnimation.duration = 0.15

imageView.layer.addAnimation(myCrossfadeAnimation,
                               forKey: “myCrossfadeAnimationKeyName”)

imageView.image = onImage
CAKeyframeAnimation
- you can chain up multiple animation points within one object(本文未阐述).
- each keyframe point can have a
CG path objectassigned, which lets you create animations that are not just linear, point-to-point transitions, but curves.
就是你要让view按一个cgpath做移动动画,也可以用CAKeyframeAnimation
let rect = CGRectMake(0, 0, 200, 200)
let circlePath = UIBezierPath(ovalInRect:rect)

let circleAnimation = CAKeyframeAnimation()
circleAnimation.keyPath = “position”
circleAnimation.path = circlePath.CGPath
circleAnimation.duration = 4

// Manually specify keyframe points
// circleAnimation.values = //...
// circleAnimation.keyTimes = //..

let trySwiftLayer = //...
trySwiftLayer.addAnimation(circleAnimation,
                            forKey: “position”)
CAAnimationGroup
没多说什么,一个简单应用:
let myPositionAnimation = CABasicAnimation.animation(keyPath: “position”)
let myAlphaAnimation = CABasicAnimation.animation(keyPath: “opacity”)

let animationGroup = CAAnimationGroup()
animationGroup.timingFunction = kCAMediaTimingFunctionEaseInEaseOut
animationGroup.duration = 2
animationGroup.animations = [myPositionAnimation, myAlphaAnimation]

let trySwiftLayer = CALayer()
trySwiftLayer.addAnimation(animationGroup, forKey: “myAnimations”)
Completion Handling
// Set a delegate object
let myAnimation = CABasicAnimation()
myAnimation.delegate = self

// Animation completion sent to ‘animationDidStop(anim: finished flag:)

// ———

//Set a closure to be executed at the end of this transaction
CATransaction.begin()

CATransaction.setCompletionBlock({
   // Logic to be performed, post animation
})

CATransaction.commit()
Features of Core Animation Subclasses
本节内容可看一个更好的RayWenderlich教程
In iOS, Apple provides a variety of CLS subclasses, with many different features.
- Some of these subclasses rely on the CPU for the operations which they perform; it may be necessary to test these on certain devices to make sure they fill your specific needs.
- To insert a CLS subclass into a UIView, all you need to do is subclass the UIView, and then override its layer class property.
public class MyGradientClass : UIView {
  override class func layerClass() -> AnyClass {
    return CAGradientLayer.self
  }
}
- CATileLayer, 基于矢量绘图的层,可以无限放大
- CAgradientLayer 运行在GPU上,非常快,通常用在用了3D变形的Layer场景,添加景深投影等效果
- CAReplicaterLayer 一个可以被复制多次的layer(on the GPU),而且复制产物还能更改自己的颜色,位置等
- CAShapeLayer 拥有一个
CGPath属性很容易进行fill, stroke等绘制,参考UAProgressView项目应用 - CAEmitterLayer 参考一个Partical Playground的Mac app,能够“发射”出其它的layer,并animat它
- CATextLayer
- CAScrollayer
- CATransformLayer
- CAEAGLayer, CAMetalLayer
资源
- PaintCode,为你创建的图片生成CoreGraphic代码
- Core Animator,为你创建的动画生成CoreAnimatioin代码
- slide to unlock 代码复现实例
- Reveal,一个视图的线上debug工具